
How much do you know about curing cannabis? If you're like many weed enthusiasts, your answer may be that you know surprisingly little!
Curing is what we call the process when cannabis goes from a living, growing plant to those delightful dried buds ready to be ground up and smoked.
In this post, we’ll shed some light on this crucial but lesser-known step of the cannabis cultivation process. What exactly happens during the curing stage, and why is it so necessary? What’s the difference between curing and drying? Let's take a closer look at the best ways to cure cannabis for a cache of top-quality flower that stays fresh for as long as possible.
What Does Weed Curing Do?
To begin, let's be clear about what curing is not. Curing isn't drying, which occurs first after the cannabis has been harvested and trimmed. Drying takes a number of days after harvest, as the initial moisture evaporates from the plant. Once the initial moisture is removed, curing is able to begin.

During the curing process, marijuana buds are stored under controlled humidity and temperature levels to help manage a further, gradual stabilization of moisture level. Curing is used rather than complete quick-drying to help preserve desirable terpenes and other cannabis compounds that can degrade or disappear during extended exposure to high temperatures.
One of the most important things to know as you learn how to cure cannabis is this: Curing significantly improves the quality of the end product. It allows for a slow breakdown of chlorophyll, which if left intact would give cannabis a harsh, grassy taste when smoked. This process enhances the smoothness, flavor, and aroma of the buds, making the smoking experience much more enjoyable.
Additionally, curing helps to reduce the risk of mold and bacteria growth by maintaining the right moisture content, which is crucial for long-term storage. Through curing, the potency of THC and other cannabinoids can also stabilize, potentially leading to a more consistent psychoactive effect. In essence, curing transforms freshly dried cannabis into a smoother, more aromatic and potent product.
How To Cure Cannabis
For those curing their cannabis at home, the process can be quite straightforward. There are two common methods used by homegrowers that don’t require expensive specialized equipment. We’ll cover both methods here, and explain which we prefer and why.
Naturally, commercial growers will use more optimized techniques and equipment to monitor and maintain temperature and humidity while curing weed, but the process of curing remains the same.
Whatever method you use, the first step is to dry your buds by placing them on a line or drying rack in a dark, mostly dry (humidity levels in the high 50s or low 60s), cool place. Allow to dry until the stems snap when bent (start checking after two days). Proceed with the curing method of your choice after drying is complete.
Method 1: The Jar “Burping” Method

Place your just-dried buds in an airtight container—a good stash jar or mason jar is best. At least daily, open up your containers to "burp" them, which allows the air inside the jar to be replaced with fresh, dry air. Many growers also use this step as a chance to inspect the buds and ensure that there is no opportunity for mold or mildew growth. If you smell an ammonia-like smell at any point, you need to go back to the drying stage. Also, if you smell anything that smells mildewy, check your buds closely for signs of mold growth and trim away anything that looks problematic.
After the flower has been cured to your satisfaction, place a humidity pack in the jar to keep it at the proper humidity level if you’re planning to open it regularly.
Whether you use this method or the next, we strongly recommend investing in a bluetooth hygrometer to quickly recognize when humidity levels get too high (above 65%) or too low (below 55%) during the curing process. If humidity is too high, revert to further drying. If it’s too low, place a humidification device like the Evergreen Pod in the container until levels are back in range.
Method 2: The Grove Bag Method

Note: we are not affiliated with Grove, we just find it to be an effective product worthy of mention.
Grove bags are engineered specifically for cannabis curing, with a membrane that allows off-gassing from a sealed bag without reducing humidity levels. They don’t require “burping”, and will maintain humidity levels as long as the environment outside the bag isn’t consistently too dry or too humid. They’ve been around since 2016, and have gotten increasingly popular with both commercial and home growers in recent years.
To cure using a Grove Bag, simply place the dried flower inside and seal the bag. Choose a bag size that is large enough to hold the flower you are curing, plus around 25% headspace. For best results, place a bluetooth hygrometer in the bag and monitor the humidity levels. Monitor closely to catch any drop in humidity from a bad seal or dry environment. If humidity drops out of range, inspect the bag seal, and place a humidity pack in the bag to restore humidity to the preferred level.
The seal on a Grove Bag works best when the bag isn’t repeatedly opened and closed, so once the flower has been cured to your satisfaction, it’s a good idea to move a few weeks’ worth to an airtight jar that is made to be opened and closed repeatedly. And, since you’ll be opening that jar regularly, throw in a humidity pod to keep your freshly cured bud fresh, tasty and effective.
The Best Curing Method
The curing method we prefer is the Grove Bag, with an Evergreen Pod as needed to correct any over-drying. Jar burping can result in well-cured buds, but we find bags to be lower maintenance. Add in an airtight container with a humidity device for everyday use and you’ll be treating your bud properly - bags for maintenance-free curing and large scale storage, and jars with humidity pods for day-to-day use.
How Long Does It Take To Cure Weed?

At a minimum, most cannabis will need at least two weeks to cure to a level that will make the smoking experience enjoyable.
Curing cannabis is one of those processes where patience is a virtue. Many growers will cure their dried nugs for about a month, though some pursue even higher-quality results by curing for up to eight weeks. On your own weed-curing journey, you’ll likely go through some trial and error to find the exact length required for a particular strain and in a particular environment.
The duration of the curing process is impacted by factors such as humidity, temperature, the strain of cannabis itself, the size and density of the buds, and how well the drying phase was managed immediately after harvest. If environmental conditions are too dry or too wet, you might need to adjust your curing time, which is why careful monitoring throughout the process is key. Likewise, this is why there is no hard-and-fast timeframe for curing cannabis.
Curing Cannabis: A Crucial Step to an Enjoyable High
Curing your buds may seem simple, but it’s an easy process to get wrong. By carefully finishing the drying process under slow, controlled conditions, growers preserve the valuable, sensitive compounds that can elevate a cannabis experience to another level.
In essence, while you can enjoy cannabis after a short cure, the quality, flavor and smoothness of your weed improves when it is cured for a longer time.
Adding a few extra weeks to your cure is always a good choice when trying to create an enjoyable final product, but we know how difficult it can be to ignore your homegrown stash for that long. Stay strong, you got this!
Let’s recap with some key tips for curing cannabis:
- Monitor humidity: Keep it at 55-65%.
- Control temperature: Maintain 60-70°F (15-21°C) and maintain as stable a temperature as possible throughout the curing process.
- For jar method: Store buds in glass jars with airtight lids.
- Burp the jars: Open jars daily for at least the first week.
- For bag method: Use the right size of Grove Bag - one that is large enough for the flower and approximately 25% head space.
- Move to a sealed container: After curing, move a portion to a sealed jar with a humidity device for daily use.
- Check buds regularly: Look for mold or too much dryness, adjusting as needed and eliminating any moldy bud that could affect the rest of your flower.
- Be patient: Aim for at least two weeks of curing, but a month or more is ideal if you can hold out.
- Smell and taste test: Sample small amounts of bud periodically if needed to check progress.
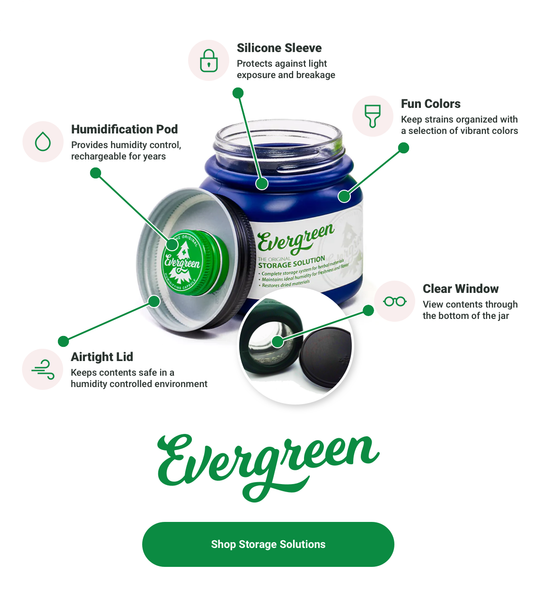
Use the Evergreen Storage Solution to Preserve Your Buds After Curing

You’ve taken the time and effort to dry and cure your weed properly, now store it in a way that keeps it fresh and tasty for as long as possible. Evergreen Pods keep your carefully-cured buds at an optimum 55-65% relative humidity, and the Evergreen Storage Solution jar protects against light and outside air. The two together are the best way to keep your cannabis in prime condition for the long term.